
Dreaming of owning a business? Consider yourself freed from the hacks of selecting a conventional store, its location, or the look and feel of your brick-and-mortar store! Online shopping is the best alternative to conventional store hunting these days. It’s not about the post-pandemic days only. Even before the virus scare, about a whopping 50% of all shopping in a month had been conducted online and one-third of the total online purchase had been effectuated through mobile phones!
So, it doesn’t matter if you have a brick-and-mortar store already. Nevertheless, you need to start an online outlet of the same. Why? Because that’s the future of shopping!
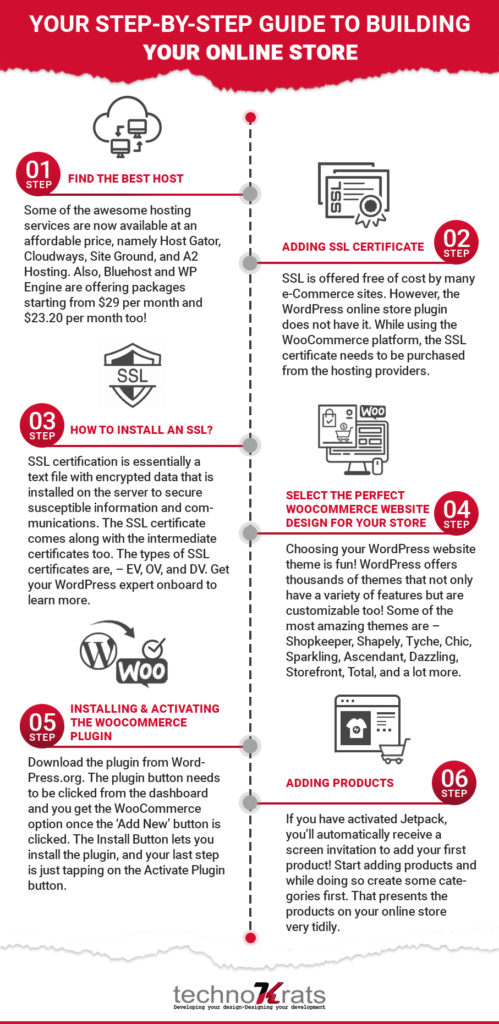
Your step-by-step guide to building your online store
It’s quite obvious for you to be baffled while you’ve decided to go online with your business. Especially, if technology is not your cup of tea, you might wonder “where to start”! A WordPress website would be the most befitting thing for your online enterprise. WooCommerce – the WordPress online store plugin – comes free with WordPress.
The option is affordable, easily customizable, and cooperates in displaying thousands of products without a single error! The easiest steps to create an e-commerce site with WordPress have been jotted down here:
WordPress For Ecommerce
1. Find the best host
Buying a domain name would be your first step. Preferably, do not choose the free hosting services. Most of them are fraudulent ones! Good hosting, these days, usually comes at an affordable price, and most of the premium hosting services provide you with the choice of buying a domain name. Some of the awesome hosting service providers are HostGator, Cloudways, SiteGround, and A2 Hosting. Besides, the website hosting providers like Bluehost and WPEngine are offering packages starting from $29 per month and $23.20 per month too!
2. Adding SSL certificate
The SSL certificate is a standard security protocol that ensures that the data transmitted between the web server and the browser, would remain encrypted. The Secure Sockets Layer certificate or SSL is offered free of cost by many eCommerce sites. However, the WordPress online store plugin does not have it.
So, while using the WooCommerce platform, the SSL certificate needs to be purchased from the hosting providers. You get to know whether your website has an SSL certificate or not from the URL – it shows up as “HTTPS://” along with a green lock symbol just beside it. For setting up the SSL set up you hardly need any help from the WordPress experts!
In case, you’re wondering why is an SSL certificate important, it assures people with a feeling of trustworthiness! To put it straight, your website users feel secure enough to share their debit/credit card details during purchase.
3. How to install an SSL?
The first step is to purchase an SSL certificate from a recognized certification authority (CA). SSL certification is essentially a text file with encrypted data that is installed on the server to secure susceptible information and communications. The SSL certificate or your SSL-enabled application comes along with the intermediate certificates too. The intermediate certificates allow the other devices that are connected to your server to identify the CA that’s issuing the SSL certificate. There’s another thing that you receive – the private key – and this should be on the server.
Your clients could search for additional authority, and to ensure that you have the extended validation (EV), certificates and organization validated (OV) certificates. The SSL certificate, is, therefore, of three types – EV, OV, and domain validated (DV). In the case of DV certificates, the green lock bar does not show any specific information about the owner. When it’s the OV certificates, the business name is listed (when the lock icon is clicked). The EV certificates require the highest amount of documentation from the organization to get the validation! The name of the business appears inside the address bar (this one’s additional to the lock icon)!
Once done, your website is updated from HTTP to HTTPS
4. Select the perfect WooCommerce website design for your store!
Choosing your WordPress website theme is fun! WordPress offers thousands of themes that not only have a variety of features but are customizable too!
You can design your store exactly the way you want! Cherry-pick from a list of both the premium and the free themes with several templates. Some of the most amazing themes are – Shopkeeper, Shapely, Tyche, Chic, Sparkling, Ascendant, Dazzling, Storefront, Total, and a lot more. Don’t worry about the costs (if you are going for the premium themes) – they’re worth it!
5. Installing & activating the WooCommerce Plugin
For your eCommerce website, this one’s the most important task – installing the WooCommerce plugin – it’s free. The plugin is downloadable from WordPress.org. This is one of the easiest tasks – the plugin button needs to be clicked from the dashboard and you get the WooCommerce option once the ‘Add New’ button is clicked. The Install Button lets you install the plugin and your last step is just tapping on the Activate Plugin button.

After activation, the window appears something like this:

So now, you click on the Let’s Go button and you get a step-by-step page setup procedure. You have to check settings step by step – Page Setup > Store Locate > Shipping & Tax > Payments.
You now start heading on – adding your business details, confirming the shipping options, and selecting the payment options. The Shipping and Tax setup requires a bit of knowledge in the concerned arena. Shipping rules are comparatively easier. After your main location has been set you can go for any one of these –
- Set a fixed price for each zone
- Give ‘live’ shipping rates by integrating with specific carriers (like UPS), or,
- Set ‘shipping’ as free!
For the payments section, both PayPal and Stripe (for accepting credit card payments) are the popular ones in use now. The wisest thing would be to install both. Your bank details could be added at a later date if you don’t have them at hand while building the website. The other payment options on WooCommerce are Authorize.Net, Square, and PayPal Pro.
Simply click on Continue after completing the payment setup. There you have your newly created online store! The additional information that WooCommerce further asks for, is optional. You only add them if you want more customization.
6. Adding products
You have done the whole thing (creating the online store) for adding products. If you have activated Jetpack, you’ll automatically receive a screen invitation to add your first product! Start adding products and while doing so create some categories first. That presents the products on your online store very tidily.
WooCommerce has this feature: it can use a category name as a slug. As a result, you don’t need to select a slug for a URL of your own. For adding products, you need the following –
- A parent category,
- Category description, and
- A genuine image of the product
- Product name and price
- Additional product images
- Long and short product descriptions
WooCommerce also provides you with the choice of adding tags. This is indeed crucial as only accurate tags will help your product to appear more frequently in the search results. Select the tags and start adding the products! Additionally, add long texts in the ‘Description’ section. If you are adding downloadable products click on the “Downloadable” option which will add a download option for the customers. Check the product reviews carefully and choose to enable or disable them!
Did you know, WooCommerce allows you to add products under six main types? They are Simple, Grouped, External/Affiliate, Variable, Downloadable & Virtual.
Read: Migrating e-commerce business to Magento
The Benefits of Ecommerce Outsourcing
- Save your precious money as ecommerce outsourcing to India is cheaper than usually imagined.
- Save your precious time while outsourcing ecommerce services and use the time to build to create better strategy.
- More flexible hours and candidate hiring
- Stay competitive and earn more revenue.
Signing off
Building an online store with WordPress is easier done than said! Yes, it’s pretty simple and in case, you are starting your business with a limited budget, it’s pocket-friendly too! The WooCommerce plugin is absolutely free. Start your new online store with a cutting-edge look within the shortest possible time.
This goes without saying that WordPress has a segregate maintenance service segment that takes care of the security issues while designing the online store. Else, hackers could easily target them!
Learn more about website security and start outsourcing web development India for the best kind of Woocommerce website development with 24/7 support. Also, you can outsource customer service India for your online store and manage products in giant e-commerce stores like Amazon, eBay, Walmart.